Things you must know ahead of time
- Which VLAN ID you wish to use: 99
- The IP range of your scope to be server by Aerohive. Aerohive can only handle a /23: 10.99.0.2/255.255.254.0
- The exclusion range: 192.168.200.1 – 192.168.200.9
- The mgt0 Sub interface you wish to use. Each DHCP must be unique to the WLAN: mgt0.3
- The IP Address and subnet mask of the mgt0 interface on the DHCP Server AP: 172.31.16.155 / 255.255.255.0
- The gateway of the address above: 172.31.16.1
- The IP address of the DHCP Server object: 10.99.0.2
The above numbers are just examples but will be used on this page.
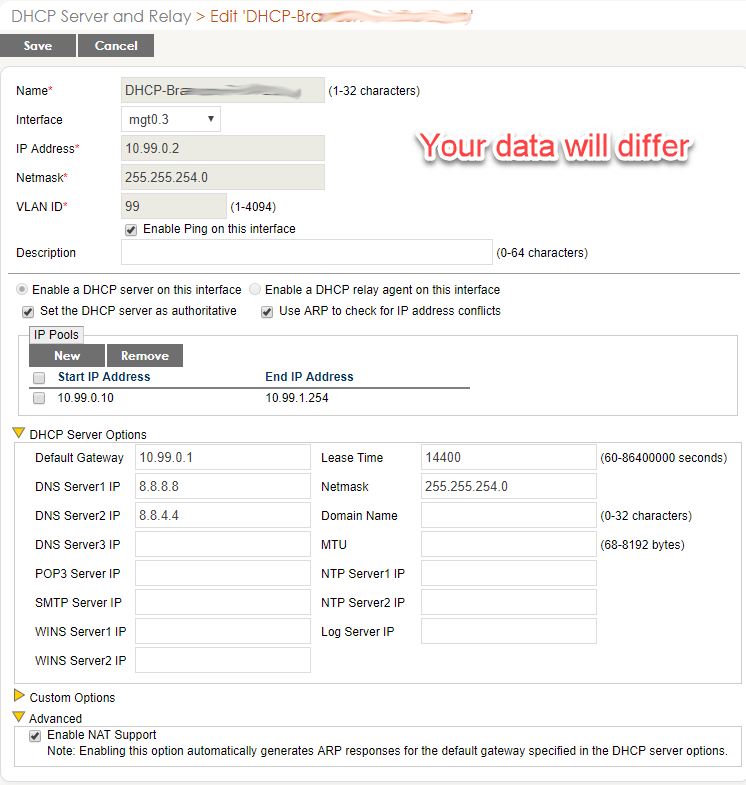
Create DHCP Server
HMOL > Configuration > Advanced Configuration > Common Objects > DHCP Server and Relay
- Click New
- Name it “DHCP” + “-“ + building, ex. DHCP-Bra…somename
- Assign a Sub Interface such as mgt0.3
- Assign it a unique IP from your IP range reservation. Use “.2”. See above.
- Use the subnet mask of 255.255.254.0
- The VLAN ID from above
- Check Enable Ping on this interface
- Click Enable a DHCP Server on this interface
- Check Set the DHCP server as authoritative
- Check Use ARP to check for IP address conflicts
- For the IP Pool,
- Click New
- Enter the beginning IP AFTER the exclusion range. Ex, 10.99.0.10
- Enter the last usable IP in your range. Ex, 10.99.1.254
- Click Apply
- Under DHCP options
- Default Gateway: The address of the DHCP Relay object from above
- DNS Server 1: Use Google, 8.8.8.8. If blocked ask the customer which DNS to use
- DNS Server 2: Use Google, 8.8.4.4. If blocked ask the customer which DNS to use
- Lease Time: 14400. This is 4 hours in seconds
- Netmask: Same as the /23 you declared above, 255.255.254.0
- The others can be filled out if needed
- Custom Options: fill out if needed
- Advanced – Check Enable NAT Support
- Scroll up and click SAVE
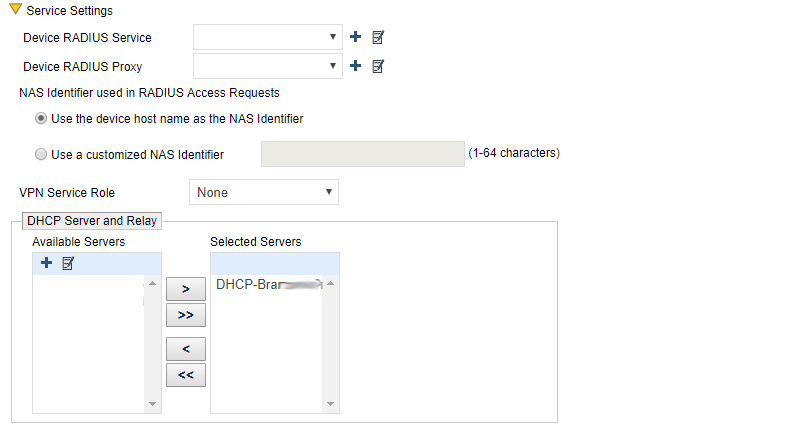
Add the DHCP Server object to an AP
Configuration > Devices > Aerohive APs
- Click on the AP you wish to make the server. Best to use an AP that won’t be as busy as others
- Scroll down to Optional Settings > MGT0 Interface Settings
- Click Static IP Address
- Enter the IP address you declared above: 172.31.16.155
- Enter the subnet mask you declared above: 255.255.255.0
- Enter the default gateway you declared above: 17.31.16.1
- Scroll down to Server Settings
- Click on the DHCP Server object create above and then click the “>”
- Click SAVE

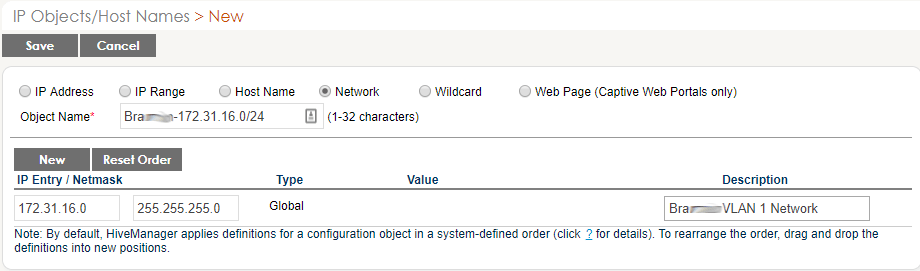
Create Needed IP Objects
HMOL > Configuration > Advanced Configuration > Common Objects > IP Objects / Host Names
- Create an IP Object for the network that the DHCP AP is assigned to.
- Click New
- Of the choices across the top, choose Network
- Name it “building” + IP range. ex., Bra…somename-172.31.16.0/24
- Under IP Entry / Netmask, enter 172.31.16.0 and 255.255.255.0
- Under Description type Bra…somename VLAN 1 Network
- Click SAVE
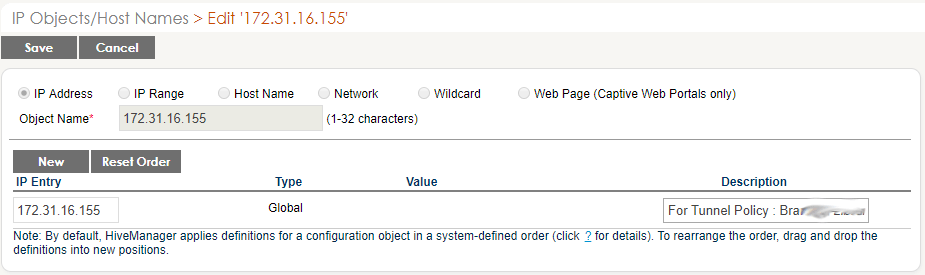
- Create an IP Object for the address of the DHCP Server AP.
- Click New
- Of the choices across the top, choose IP Address
- Enter the IP address of the DHCP Server AP, ex., 172.31.16.155
- Enter a description
- Click SAVE
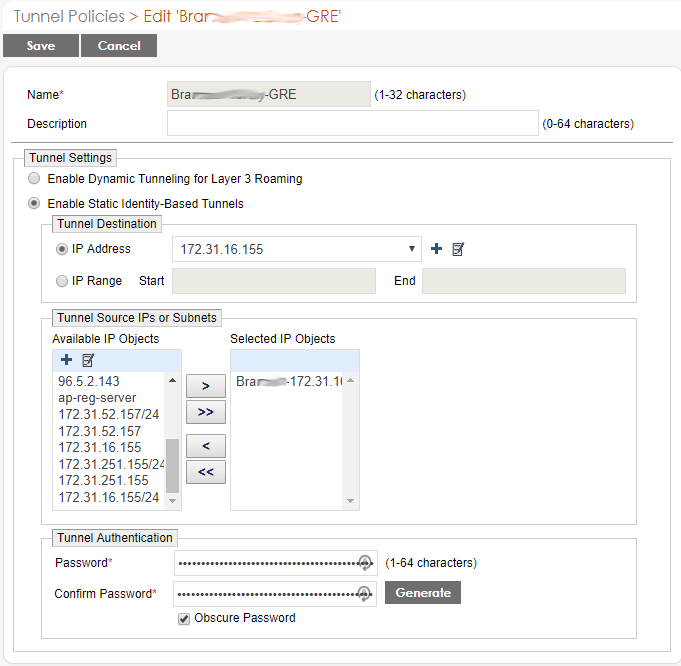
Create the GRE Tunnel Policy
HMOL > Configuration > Advanced Configuration > Common Objects > Tunnel Policies
- Name it building + “-GRE”, ex. Bra…somename-Library-GRE
- Click Enable Static Identity-Based Tunnels
- Use the drop down menu to add the IP Object for the address of the DHCP Server AP.
- Under Available IP Objects, choose the IP Object for the network that the DHCP AP is assigned to.
- Click the “>” to move the object to the right window.
- Under Tunnel Authentication click the Generate button. You’ll never need to see that password.
- Click SAVE
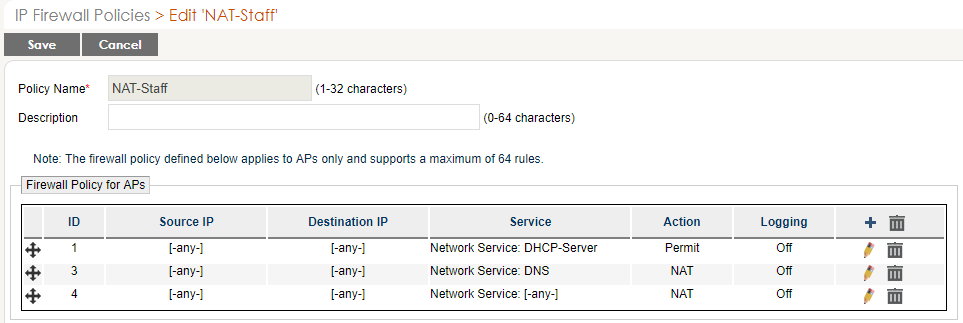
Create the Firewall Policy for NAT
HMOL > Configuration > Advanced Configuration > Security Policies > IP Firewall Policies
- Create an unhindered firewall
- Click New
- Name it NAT + “Staff”, ex. NAT-Staff
- Create the rules to match the image then SAVE
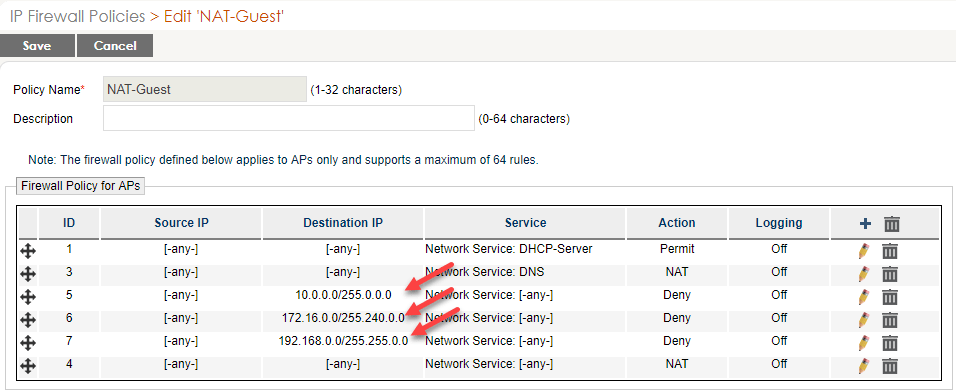
- Create a firewall to disallow station to station activity
- Click New
- Name it NAT + “Guest”, ex. NAT-Guest
- Notice the differences
- Create the rules to match the image then SAVE
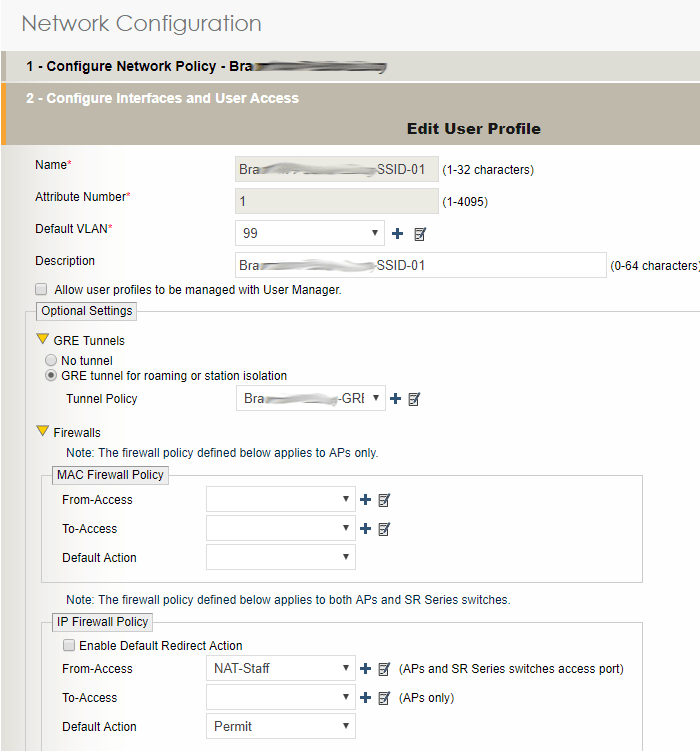
Adding the Aerohive Firewall and GRE Tunnel to a User Profile
Configuration > Network Configuration > 1-Choose Network Policy
- Click the Policy that will host the DHCP Server
- Create a SSID as you would normally.
- The User Profile must use a unique attribute and use the VLAN ID that you declared above: 99
- Click the drop down arrow next to GRE Tunnels
- Click GRE tunnel for roaming or station isolation
- In the drop down menu, choose the Tunnel created above, ex., “Bra…somename-GRE”
- Scroll down to Firewalls
- In IP Firewall Policy > From-Access, choose the Firewall to match your SSID security
- Click SAVE