There are different ways to setup a new wireless controller. This is the way I prefer that seems to be the
quickest for me. You would think it would be easier to do a few quick commands through the CLI but it
requires too much information to get started. After all I just want to get the wireless controller up
quickly to put the configuration file on it which will override any initial information. The instructions for
CLI are after the GUI section for those who prefer using CLI to configure.
I setup the CIMC first. Then I download the desired version of code to the controller. All of our
controllers have the same basic configuration, so I change what I need to for a particular school in the
config file and push that to the new controller. I use TFTP on my laptop for these tasks.
CIMC setup
Choose option <F8> – Cisco IMC Configuration from startup screen
You will have to set a password to continue. The default password is password.

Uncheck DHCP enabled to configure a static IP address and enter that address.
Choose <F10> to Save
If you want to set the hostname you can choose <F1> for additional settings

Configuring the Controller using GUI
Set a static IPv4 IP address on your laptop
The default IP address for the service port is 192.168.1.1 255.255.255.240. The default gateway is the wireless controller (192.168.1.1). The laptop must be in the same subnet as the controller to browse to the configuration wizard. I use 192.168.1.2 255.255.255.240 on the laptop.
Connect a laptop to the service port
Browse to the controller using http://192.168.1.1
I configure the minimum settings for the controller. The goal is to put in the information required and then push a configuration file to the controller.
Set administrator account

Set up the controller
Enter the System Name, Management IP Address, and Management VLAN ID

Create Wireless Network
I enter the Network Name, leave WPA2 Personal and a pass phrase.
This is just to get through the configuration wizard.
The config file I push to the controller will override all of this information.

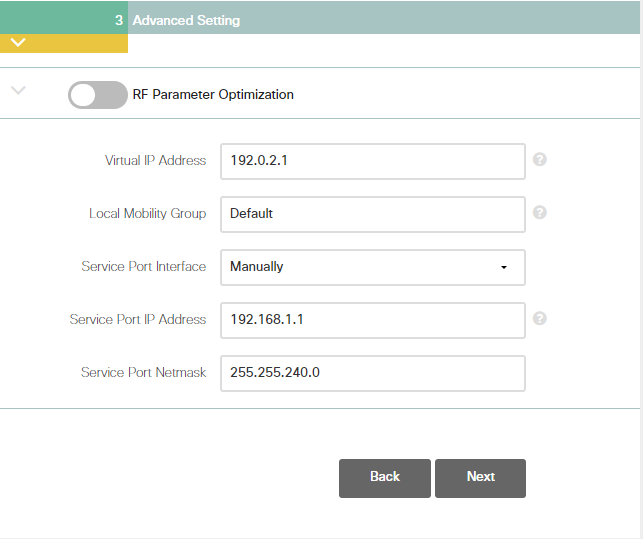
Advanced Settings
You will need to set the service port IP address here as the 192.168.1.1 address will default to 0.0.0.0 if there isn’t a DHCP server on the same subnet. Service Port Interface default is Using DHCP.

If you make this mistake as I have in the past you can always connect to the Serial COM port with a console cable and set the service port through CLI. I normally have my laptop connected to the service port and the COM port during the controller setup process.
Command to view the current service-port interface settings
show interface detailed service-port
Command to disable the DHCP server
config interface dhcp service-port disable
Command to configure the service port
config interface address service-port (ip address, subnet mask)
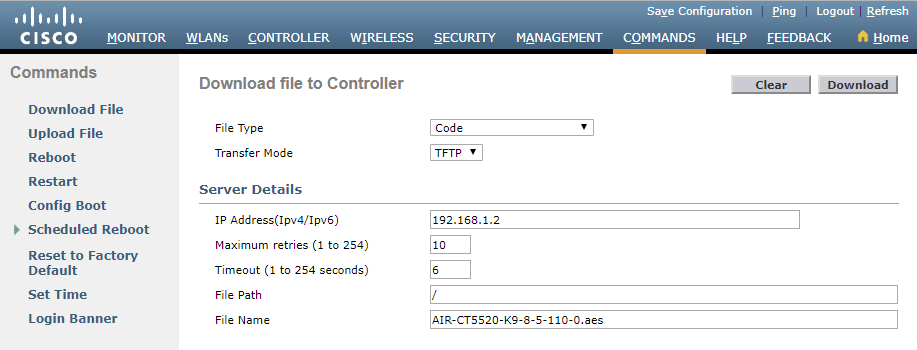
Download the desired version of code to the controller
Browse to the controller through the service port using https://IP_address set above
Click on Advanced in the top right of the first screen

Click on Commands
File Type should be Code
Transfer Mode – I use an TFTP server on my laptop to transfer
I set the IP address, file path, and file name

Download the configuration file

The wireless controller is now ready for production.
Configuring the Controller using CLI
Default options appear in all uppercase letters in brackets.
You will receive an “Invalid Response” notification for any incorrect input.
The hyphen key will return to the previous line.
When prompted to terminate the AutoInstall process, type yes. This will allow you to answer a series of command line options for initial configuration.
Enter the system name for the controller – System Name (31 characters max):
Enter the administrative User Name (24 characters max):
Enter Administrative Password (3 to 24 characters):
Re-enter Administrative Password:
Service Interface IP Address Configuration [static] [DHCP]:
Service Interface IP Address:
Service Interface Netmask:
Enable Link Aggregation (LAG) [yes] [No]:
Management Interface IP Address:
Management Interface Netmask:
Management Interface Default Router:
Management Interface VLAN Identifier:
Management Interface DHCP Server IP Address: (IP address of the DHCP server that will serve clients)
Enable HA [yes] [NO]:
Virtual Gateway IP Address:
Multicast IP Address:
Mobility/RF Group Name:
Network Name (SSID):
Configure DHCP Bridging Mode [yes] [NO]:
Allow Static IP Addresses [YES] [no]:
Configure a RADIUS Server now? [YES] [no]
If you choose no you will get this warning:
Warning! The default WLAN security policy requires a RADIUS server.
Please see documentation for more details.
Enter Country Code list (enter ‘help’ for a list of countries) [US]
Enable 802.11b Network [YES] [no]:
Enable 802.11a Network [YES] [no]:
Enable Auto-RF [YES] [no]:
Configure a NTP server now? [YES] [no]:
Configure the system time now? [YES] [no]:
If you choose no you will get this warning:
Warning! No AP will come up unless the time is set.
Please see documentation for more details.
Would you like to configure IPv6 parameters [YES] [no]:
Configuration correct? If yes, system will save it and reset. [yes] [NO]:
